|
First thing to note is most, if not all mobile (car/boat/rv) radios are rated at 13.8V 12V is about 13% below the nominal voltage rating, so your radio output will be reduced. - If your radio is rated to transmit 10 watts, you will loose about about 1.3 watts. Something to think about, but probably acceptable in the short term. Second thing to note is a 30 amp, 13.8V regulated power supply can be bought brand new for under $100 So don't rush out a buy a computer power supply, think about your options. This project is fairly straight forward and not to much knowledge about electronics will be needed, however it does give an opportunity to tune up your soldering skills. Even though you won't be working on high voltage (120v) it will be present inside the PC power supply and great care should be used to protect yourself from a potentially dangerous or even lethal accident. |
|
you: let's get on with it me: just a little bit more Computer PSU's are labeled by how much power they may require, and what voltages and amperages they can deliver. I have an old, small computer PSU labeled: +12V 17A +5V 18A Most of my other PSU's are rated higher. +12V at 17A should be sufficient up to 50 watt output radios. Check you radio's requirements.
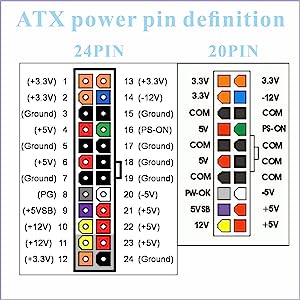
Ok, so now you know how to trick the psu into working ... next is to decide is how far you want to get into this - easy - purchase a connector for your 20 or 24 pin plug. I just checked amazon for a "atx 20 pin breakout" and there are several different choices for under $20 I saw one I liked that had a USB port to power/charge devices - nice PROS - you won't have to ground the PS-ON pin, just plug the PUS into the breakoutbox. CONS - you don't get the fully rated amperage from your power supply, and where is the challenge? a little more work - cut the plug off, strip and connect the green wire to one of the black wires. The yellow wire is +12v and the black wires is ground/common (the 24 pin connector has 2 yellow wires - they are both +12 - connect them together) cut the plugs of of the other connectors (they are the plugs that power hard drives and such) combine all the yellow wires for your +12 volts combine all the black wires for your ground/common PROS - no extra money spent, you get the full amperage, and you get to be a little destructive. CONS - not as pretty, kind of a simple hack - pff let's get crazy - ya, this is the route I took - rip apart the power supply ok, before you rip into the box, leave it unplugged for a while - maybe take a day to think about it - anyways, give the psu time to discharge - at least 10 minutes, even more if you can wait ... there are some nasty charges in there just waiting for some skin or metal to jump on. cut the plugs off, you will need to pull the wires through the hole in the case. find the green wire from the main bundle and ground it - I unsoldered one of the black ground wires and shorted the green wire, then soldered the green wire where I pulled the black wire from. shorten and connect all the yellow wires except one - (we are going to leave one black and one yellow for later) connect a heavy gauge red wire to the messy bundle of yellow wires - this red wire will be the +12v going to your radio. shorten and connect all the black wires except one - (we are going to leave one black and one yellow for later) connect a heavy gauge black wire to the messy bundle of black wires - this black wire will be the ground going to your radio. feed the red and black wires you just added through the hole, along with the yellow and black wire you didn't shorten. if you have heat shrink tubing go ahead and cover all your connections now - if you are like me and don't have any heat shrink tubing, use electricians tape to cover all your connections. reassemble the psu and plug it in and turn it on - check for smoke, sparks and +12 volts on your black and red wires. if all is good, you should be able to connect it to your radio and admire your work. PROS - now you feel like you accomplished something. CONS - this probably cancels out the warranty on the power supply bonus points - add a usb charging device the two wires left over can be uses to power a 12v to usb car adapter. yellow (+12v) goes on the tip of the adapter, and you should be able to figure out where the black wire goes. your choice, try and solder to the adapter without taking it apart - or do what I do and tear it apart. wrap it up good with some electricians tape and you are good to go. Take care, Walt KK7LKQ |